
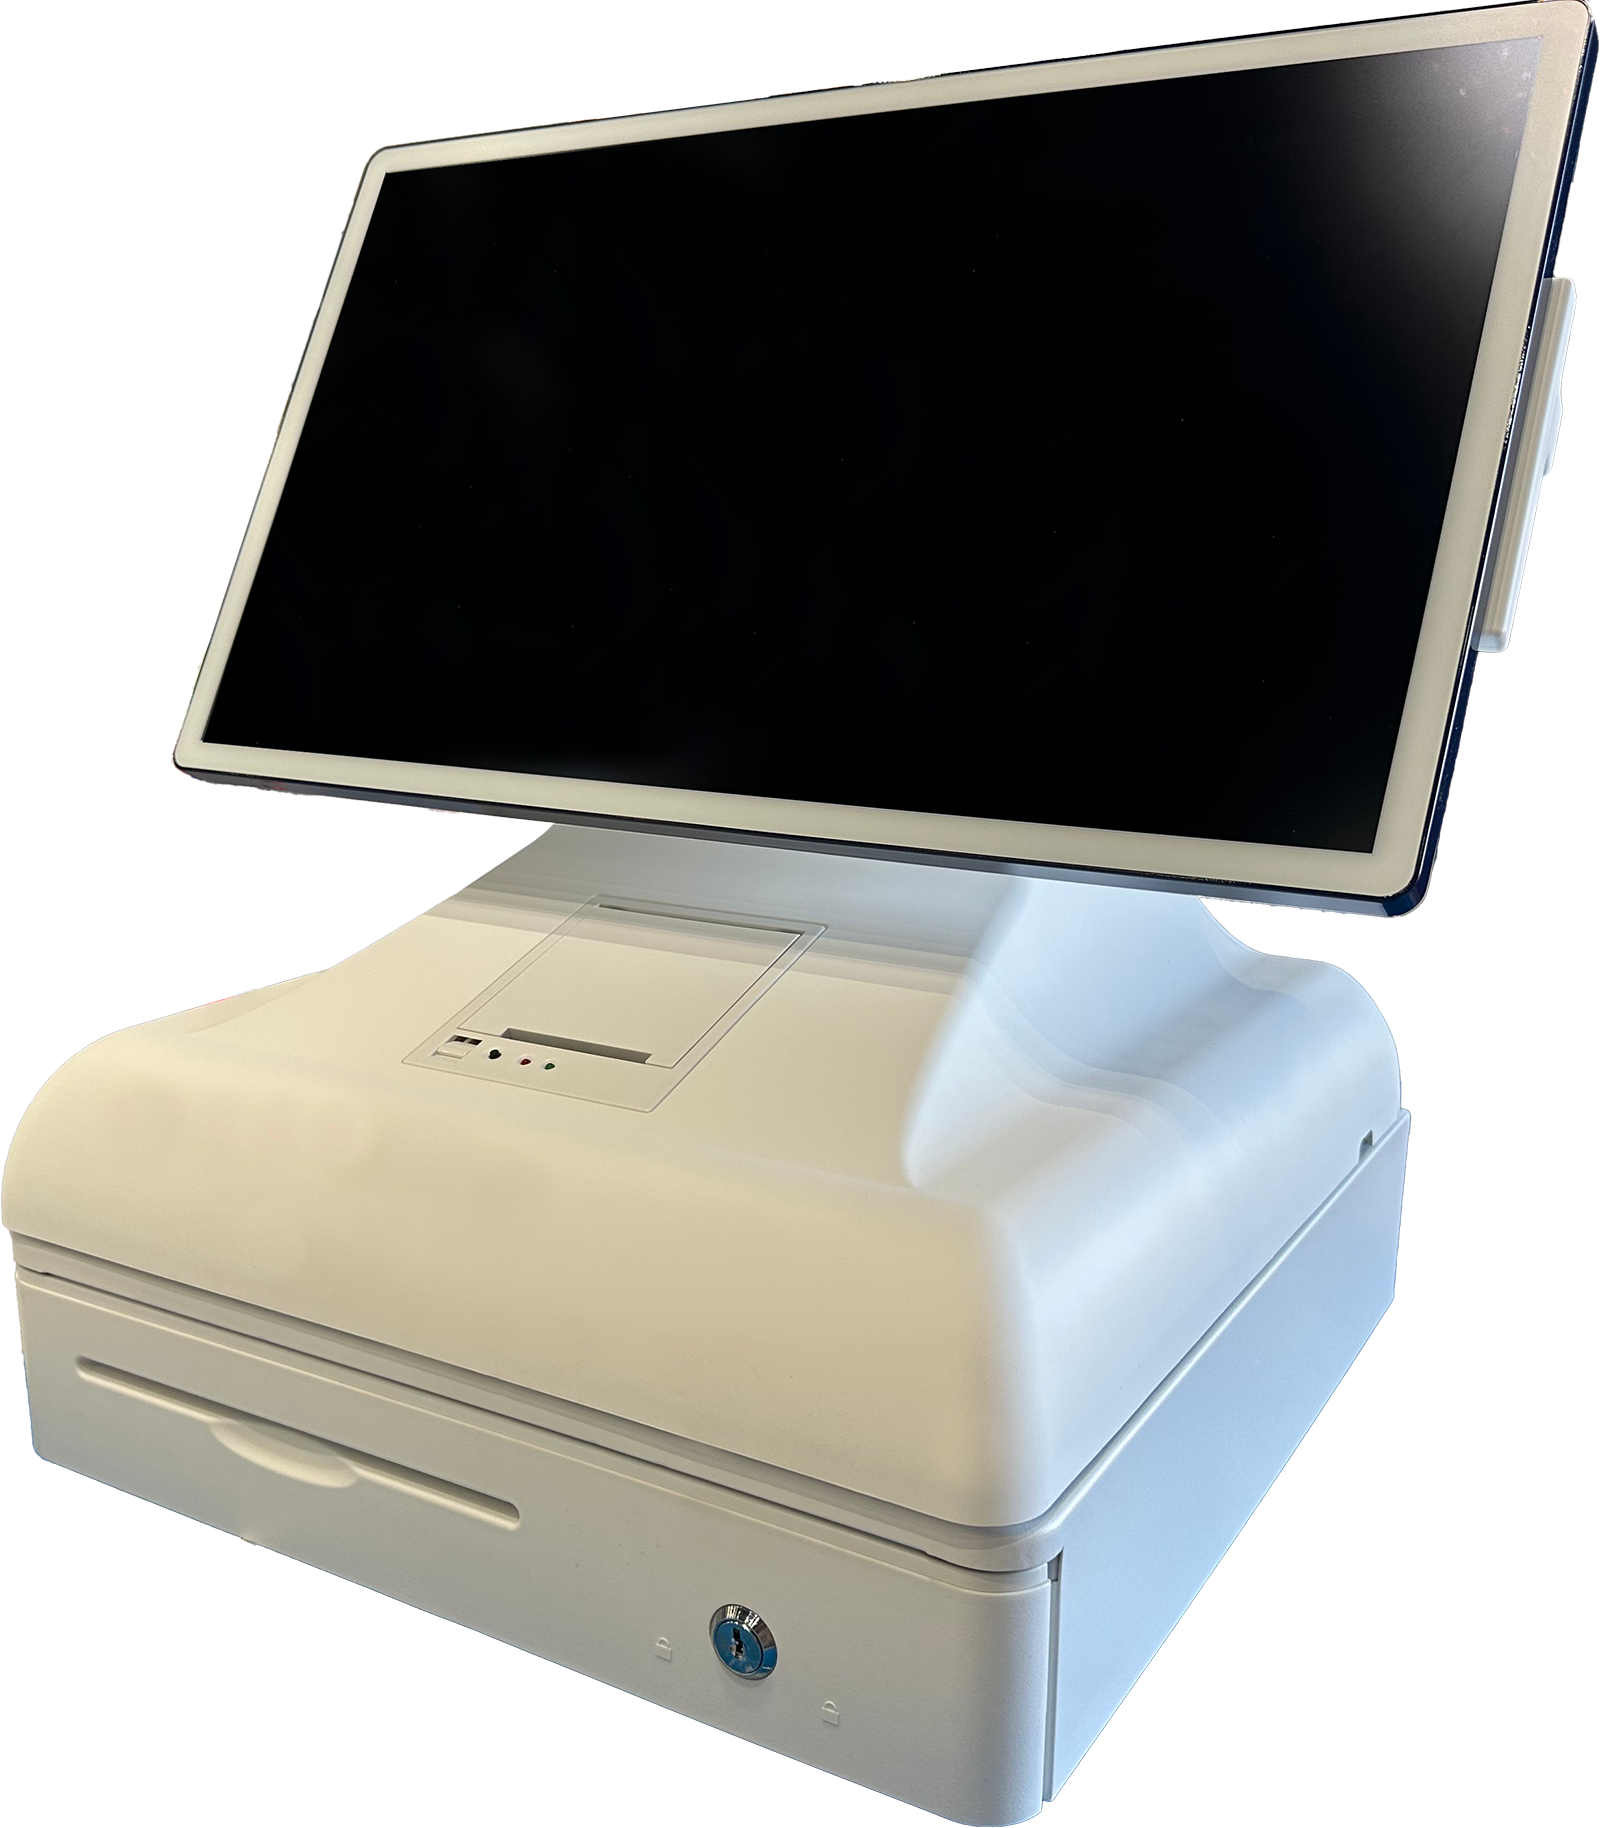
NailSoft AiO
Instruction Manual
A. Preparation
Have the Required Tools for the job: Box cutter, Phillips Screwdriver.
Downloaded the FastField mobile app (Apple or Android) in order to complete the Install Verification form at the end of the job.
B. Arriving On-Site
Head inside the store and ask for a Store Manager or the Owner. Let them know you are there to “install their new NailSoft AiO point-of-sale machine.” Show them the Letter of Approval that was attached to your work order. If the manager wants to reschedule, you must contact KSG immediately before leaving the site.
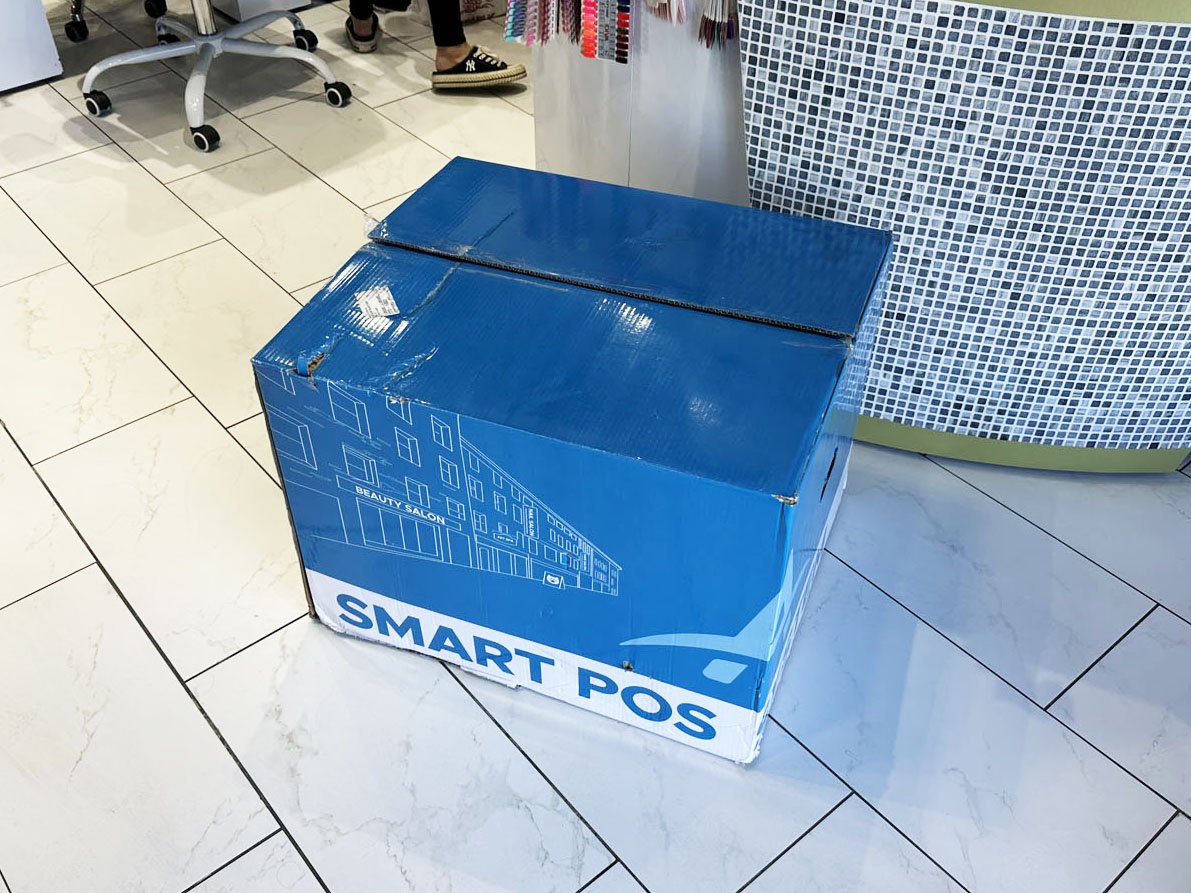
The NailSoft AiO was shipped directly to the store in a large blue box with “Aurora-In-One Smart POS” written on it. Ask the Store Manager for this box and bring it to their front desk. Confirm the general placement with the manager for where they want the NailSoft AiO to be installed so you know where to unbox the equipment (you’ll confirm the exact placements of each piece in the next steps).
The store may have also received a separate shipment if they ordered the iPad Check-In tablet(s). If the store received these, they can login themselves using their Merchant ID and Password (no installation is needed for these).
C. Unbox the Equipment
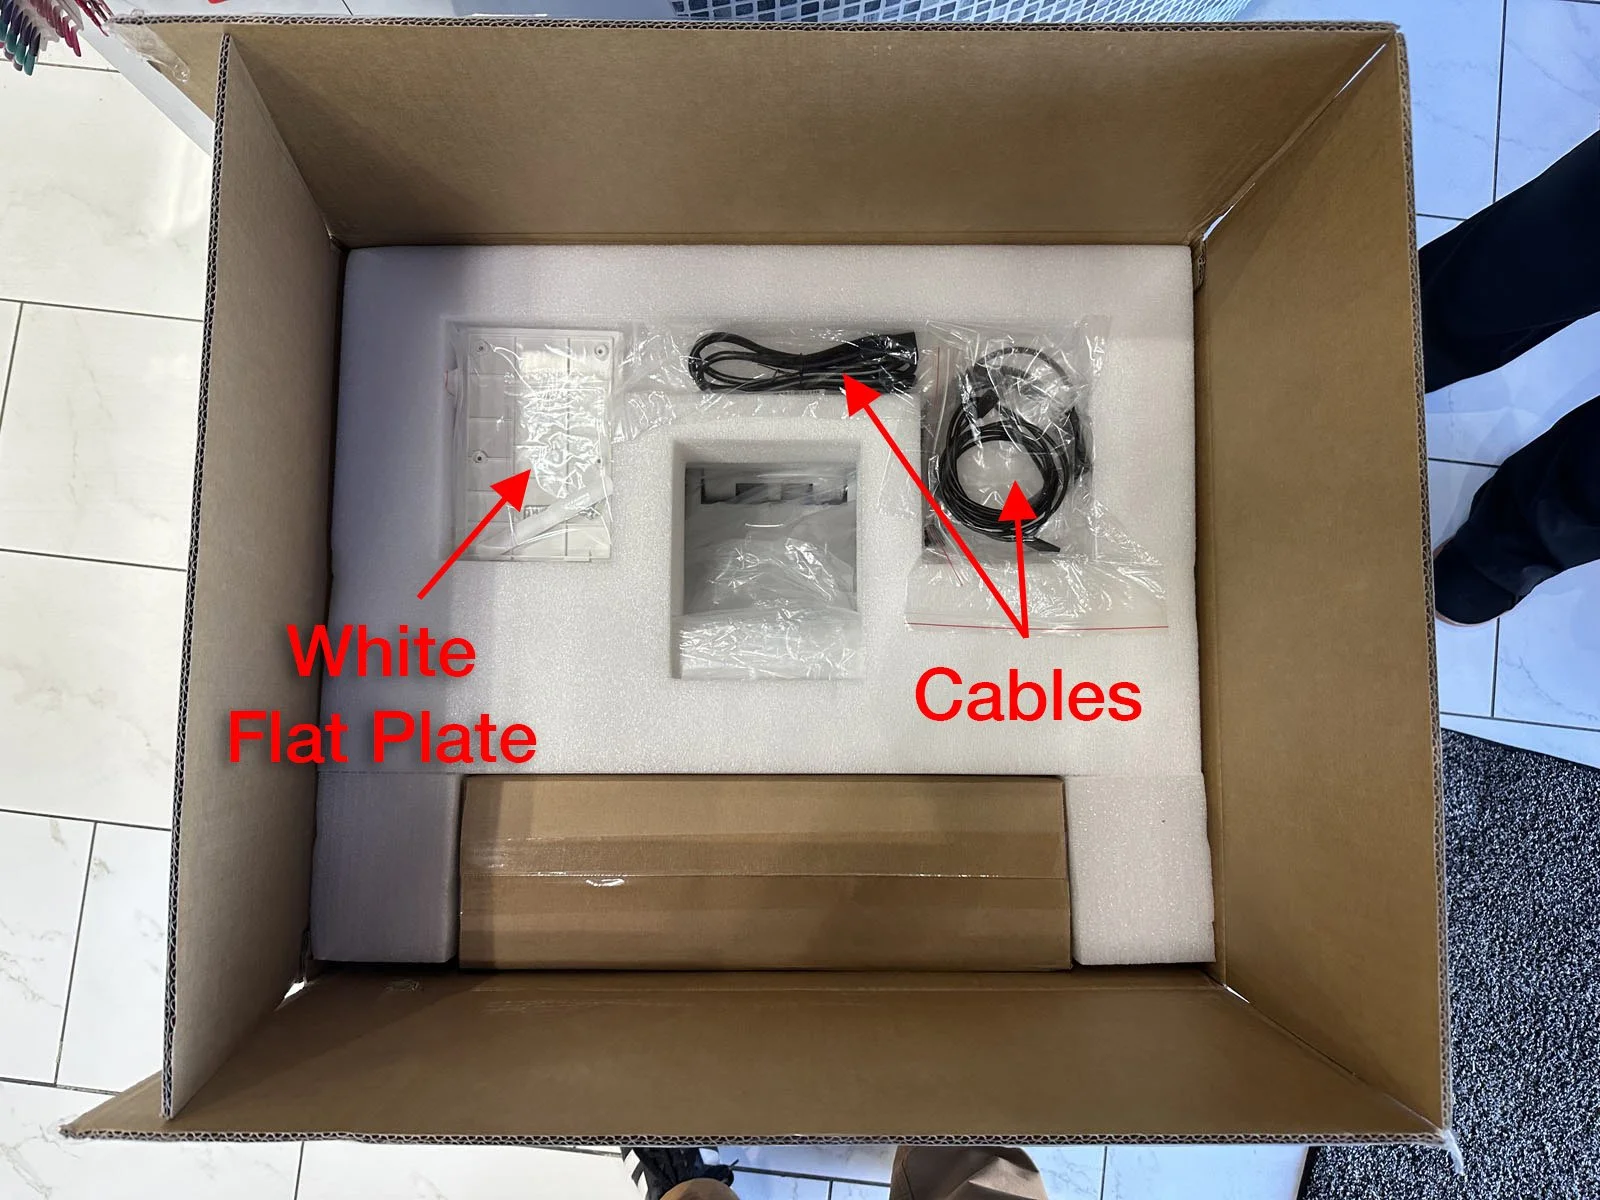
Carefully remove all contents from the box and confirm all of these parts are present:
Payment Terminal (Dejavoo QD4 or Sunmi P2)
4 cables: Power cable, black Ethernet Extension cable, white RJ-11 Extension cable and a USB-C Extension cable.
White Flat Plate
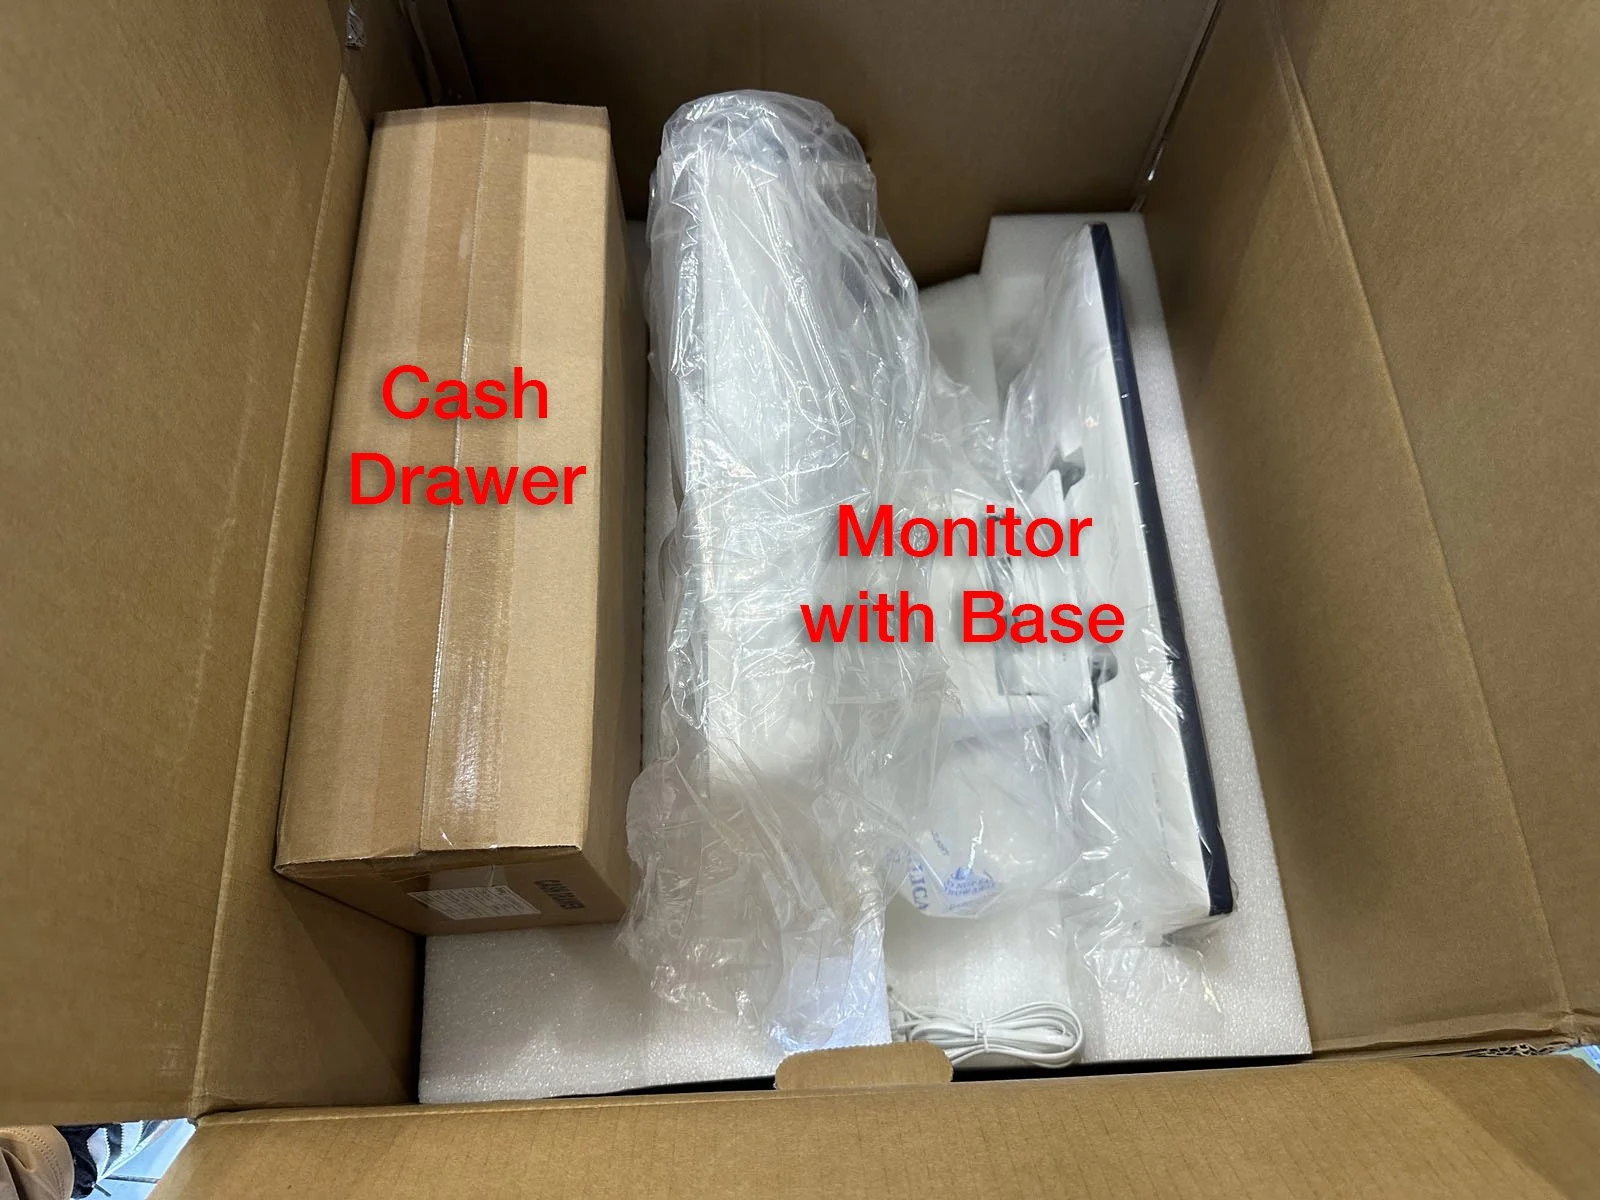
Monitor with Base
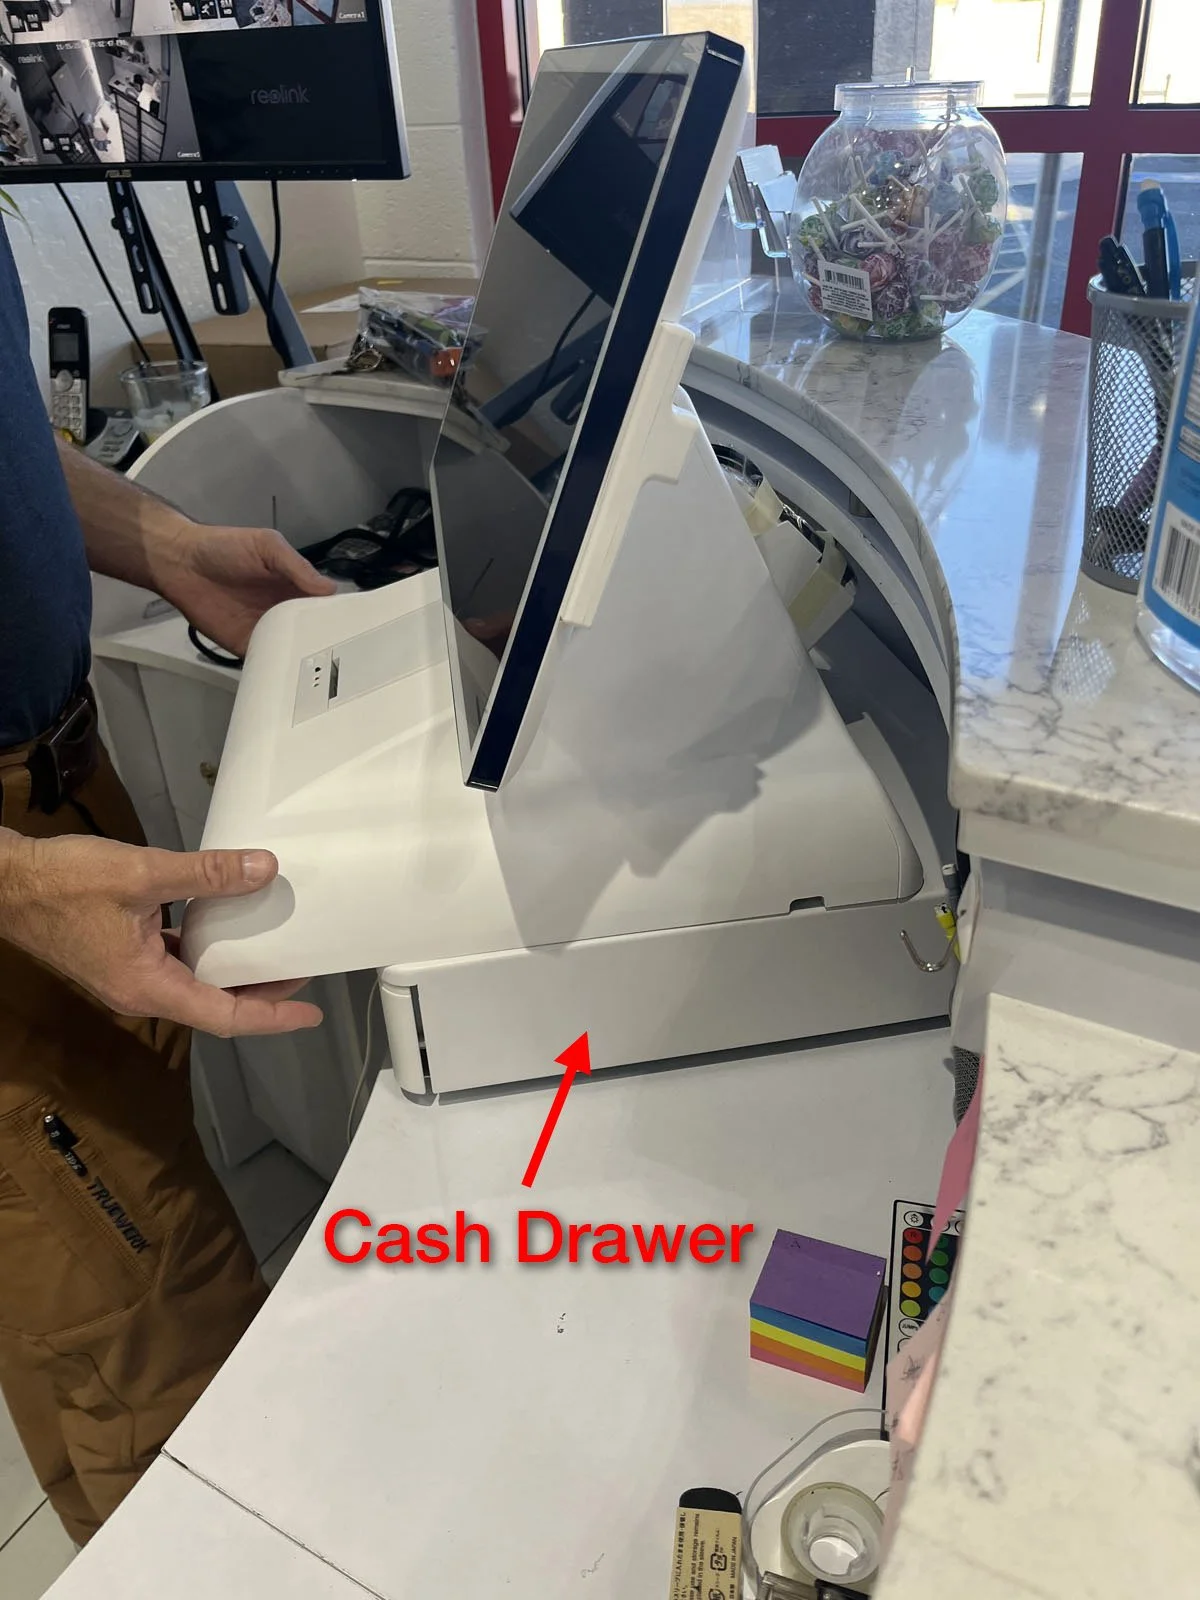
Cash Drawer
Open the Cash Drawer packaging box and find the keys attached to the white RJ-11 cable. Give the keys to the Store Manager and let them know they’re for their Cash Drawer.


D. Install the NailSoft AiO
There are 2 pieces to the NailSoft AiO: the Cash Drawer and the Monitor with Base. In the simplest version, these pieces will be installed together as one whole unit. However, the store may want them installed separately. Follow the steps below to determine the installation for each piece.
Determine where the Cash Drawer will be installed by asking the Store Manager where they want it located. Option 1 (primary) is on the countertop mounted directly below the Monitor Base, where it will look like one whole unit. Option 2 is to place the Cash Drawer separate from the Monitor Base, under the counter or in a cabinet. Then place the Cash Drawer where the manager wants it to be located.
If Option 2, separate from the Monitor Base, it must be within 6’ of where the Monitor Base will be placed and capable of routing a cable without drilling holes. Plug in the white RJ-11 Extension cable into the RJ-11 cable coming out of the Cash Drawer and route it to where the monitor will be placed.
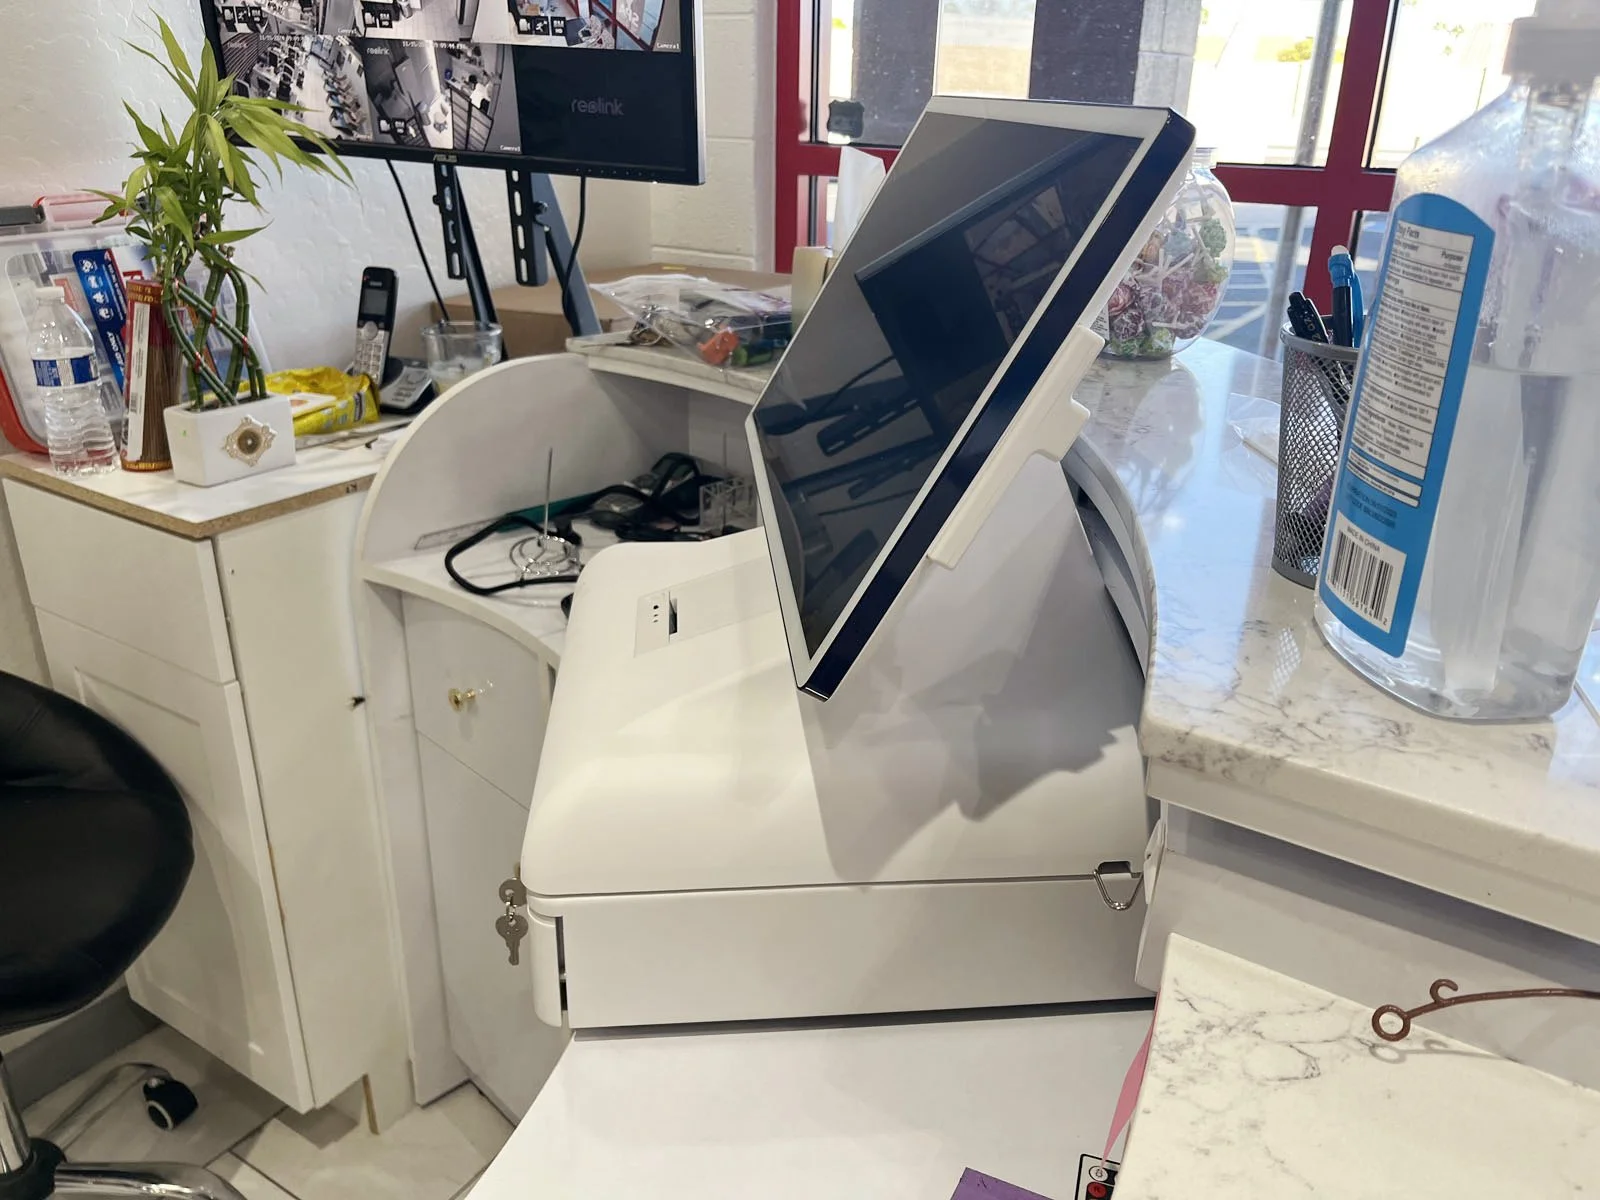
Install the Monitor with Base on the counter where the Store Manager confirms they want it placed. If placed on top of the Cash Drawer as one unit (Option 1 above), it will snap magnetically on top of it.
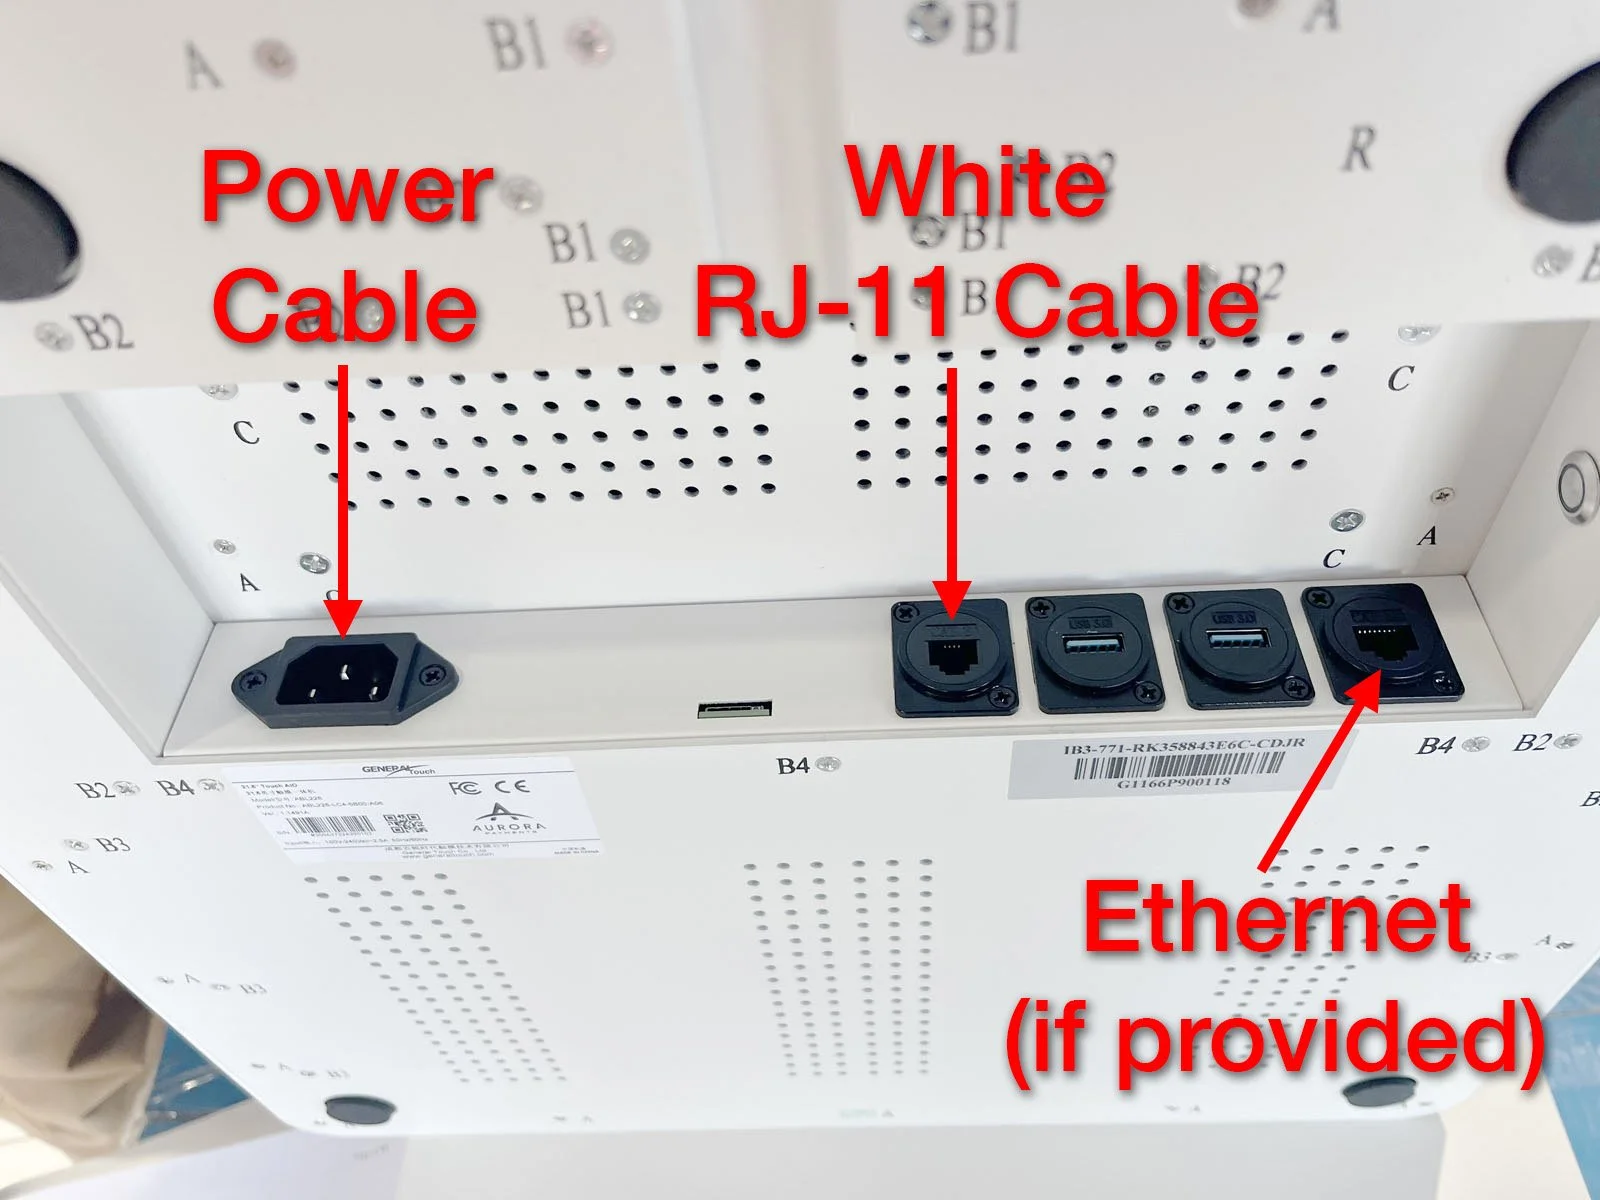
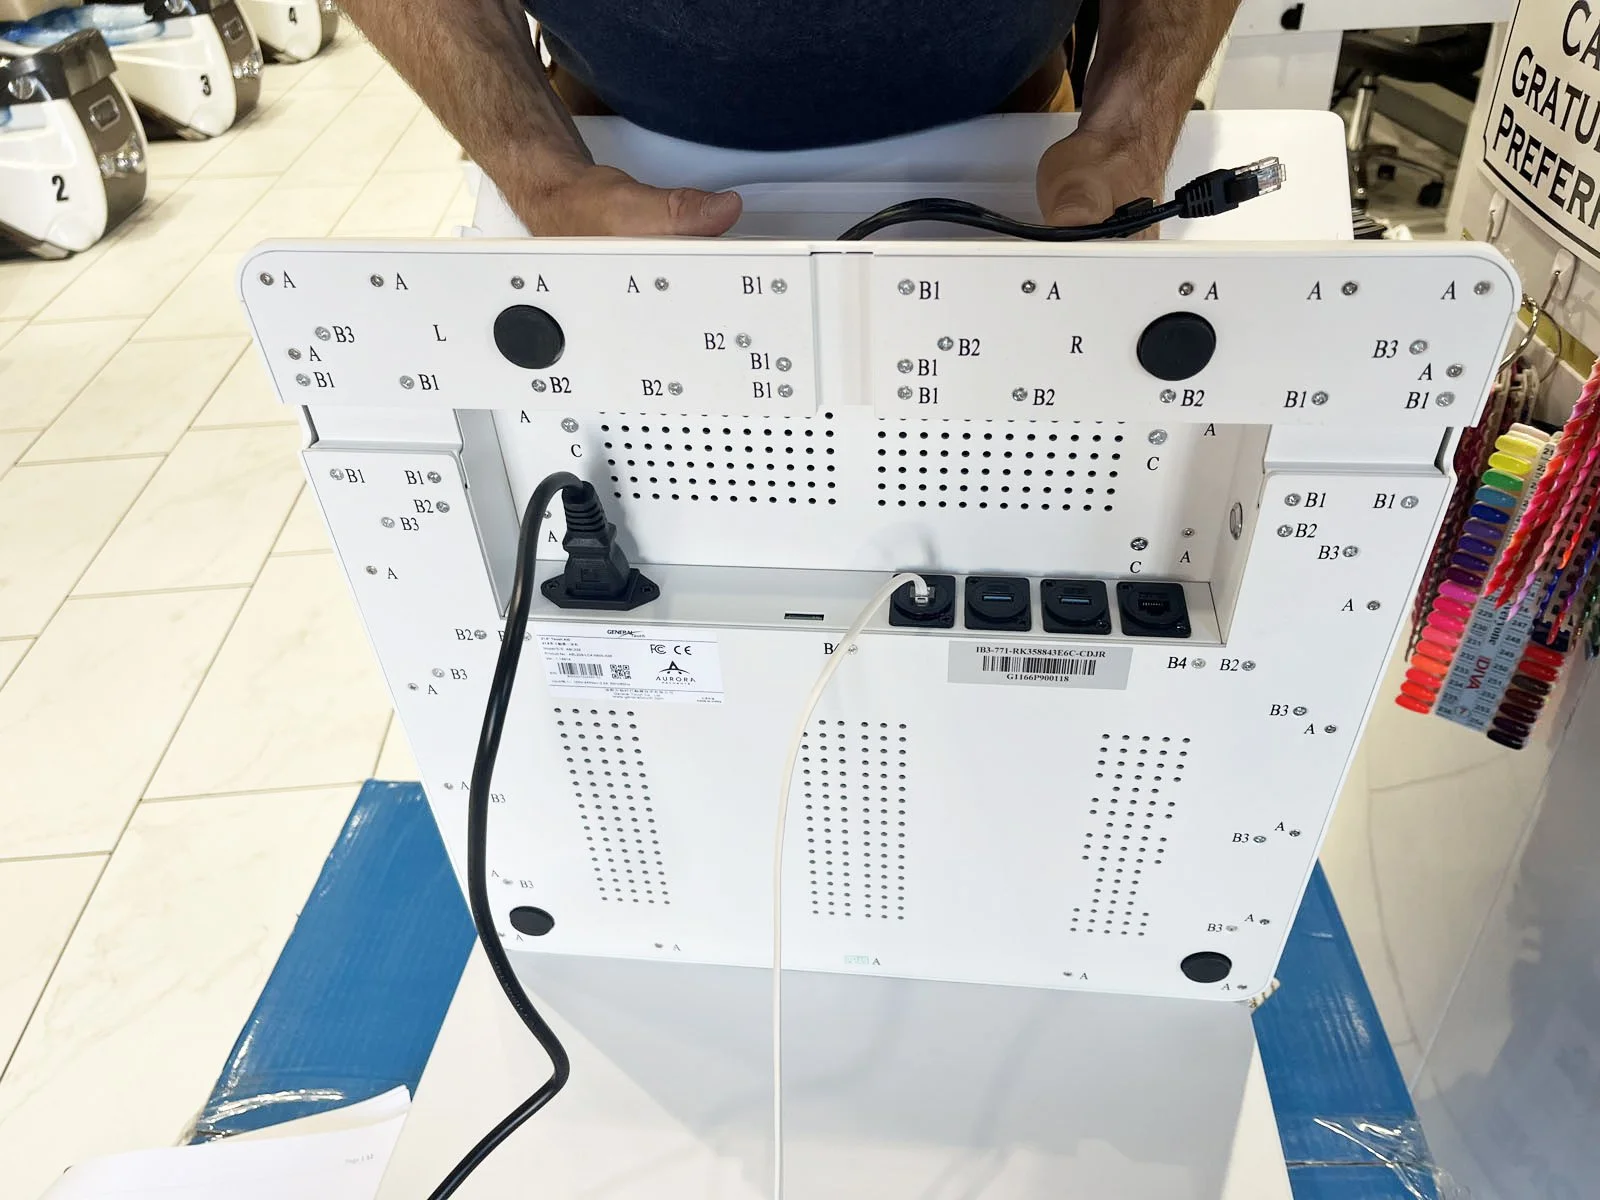
Plug in cables under the base of the Monitor. Grab the power cable that came in the box. Carefully lift up the Monitor Base (you must support the weight of the monitor as you do this) and plug the power cable into the power slot on the bottom. Then plug in the white RJ-11 cable coming from the Cash Drawer into the CAT.3 port. Lastly, if the store has an ethernet cable supplied to this spot and wants it hardwired for internet, then plug in their ethernet cable into the CAT.5E port on the bottom. With these cables connected, carefully place the monitor back down and route the cables through one of the appropriate slots (coming out the back or side).
Plug in the power cable to their nearest outlet or power strip.
E. Install the Payment Terminal
There are two different types of payment terminals that ship with the NailSoft AiO: Dejavoo QD4 or the Sunmi P2. Determine which model was shipped inside the AiO box, then click on the model below for the specific installation instructions.


F. Booting up the NailSoft AiO
For these next steps, the store’s WiFi Name, WiFi Password, Merchant ID and Merchant Password can all be found in your work order under Buyer’s Custom Fields.
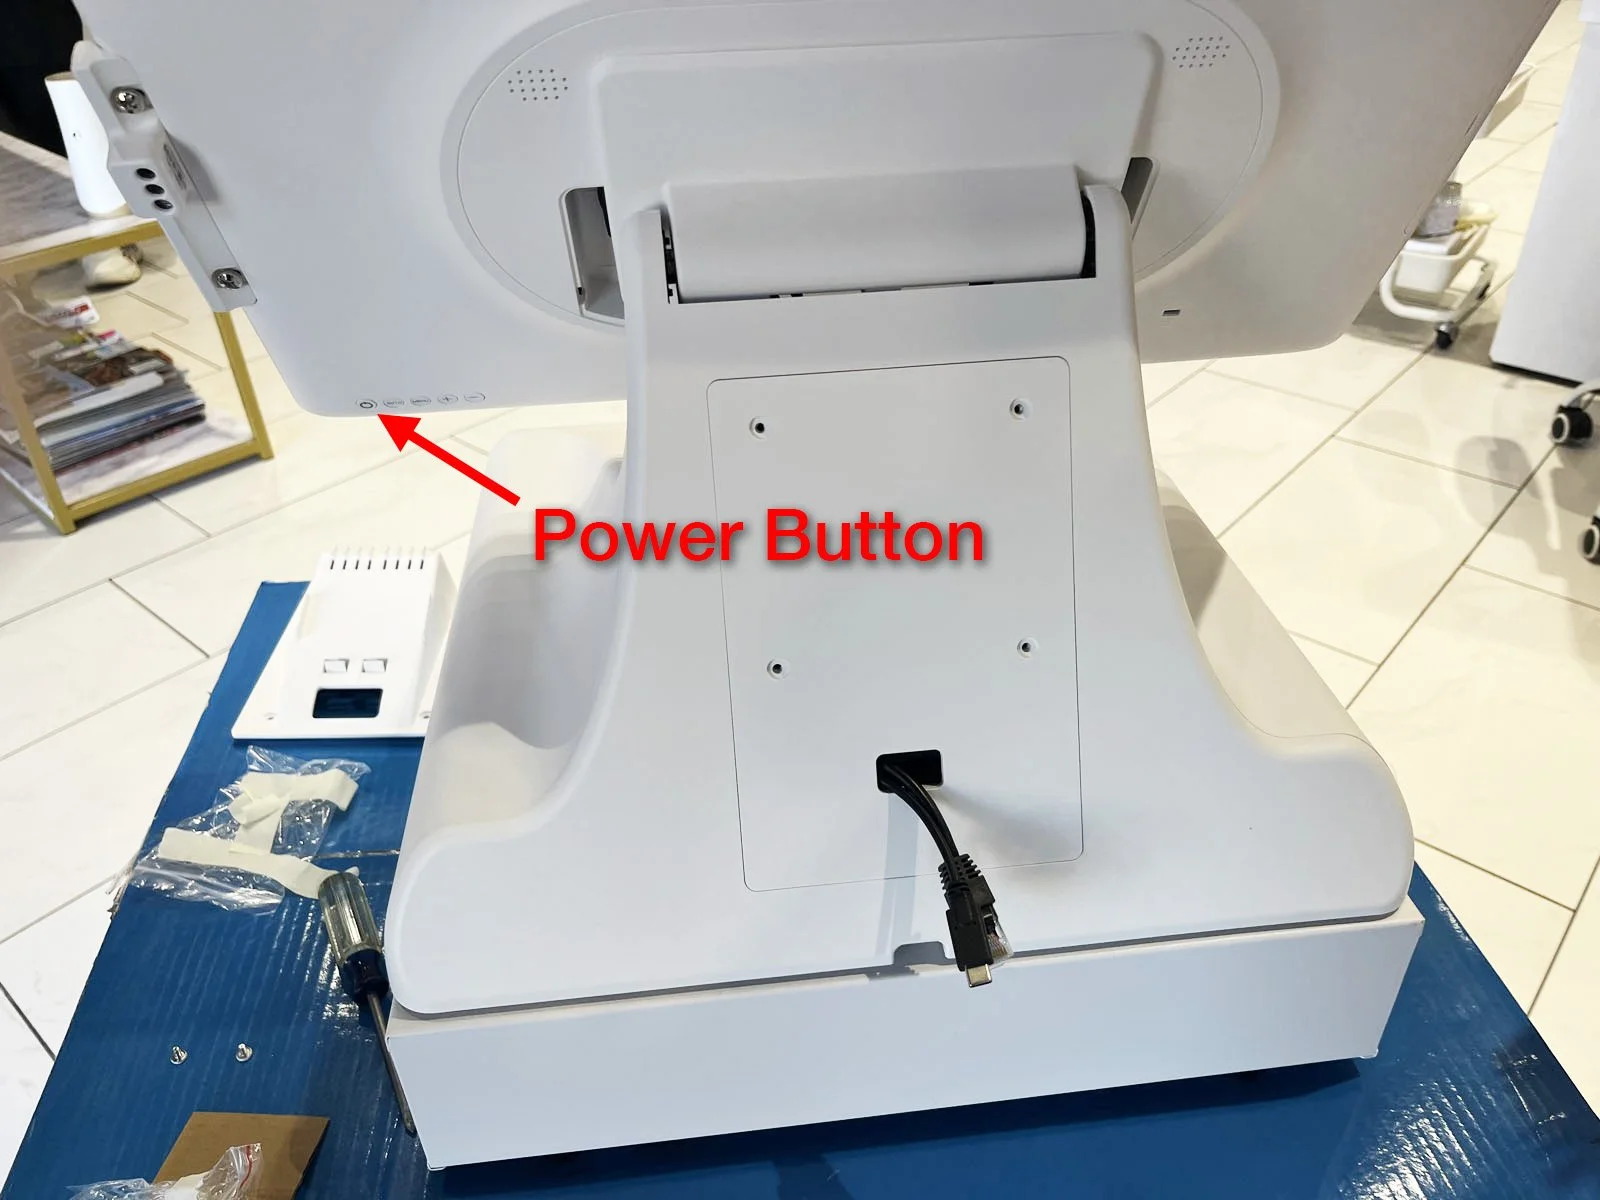
On the NailSoft AiO, press the power button on the back of the monitor to turn it on.
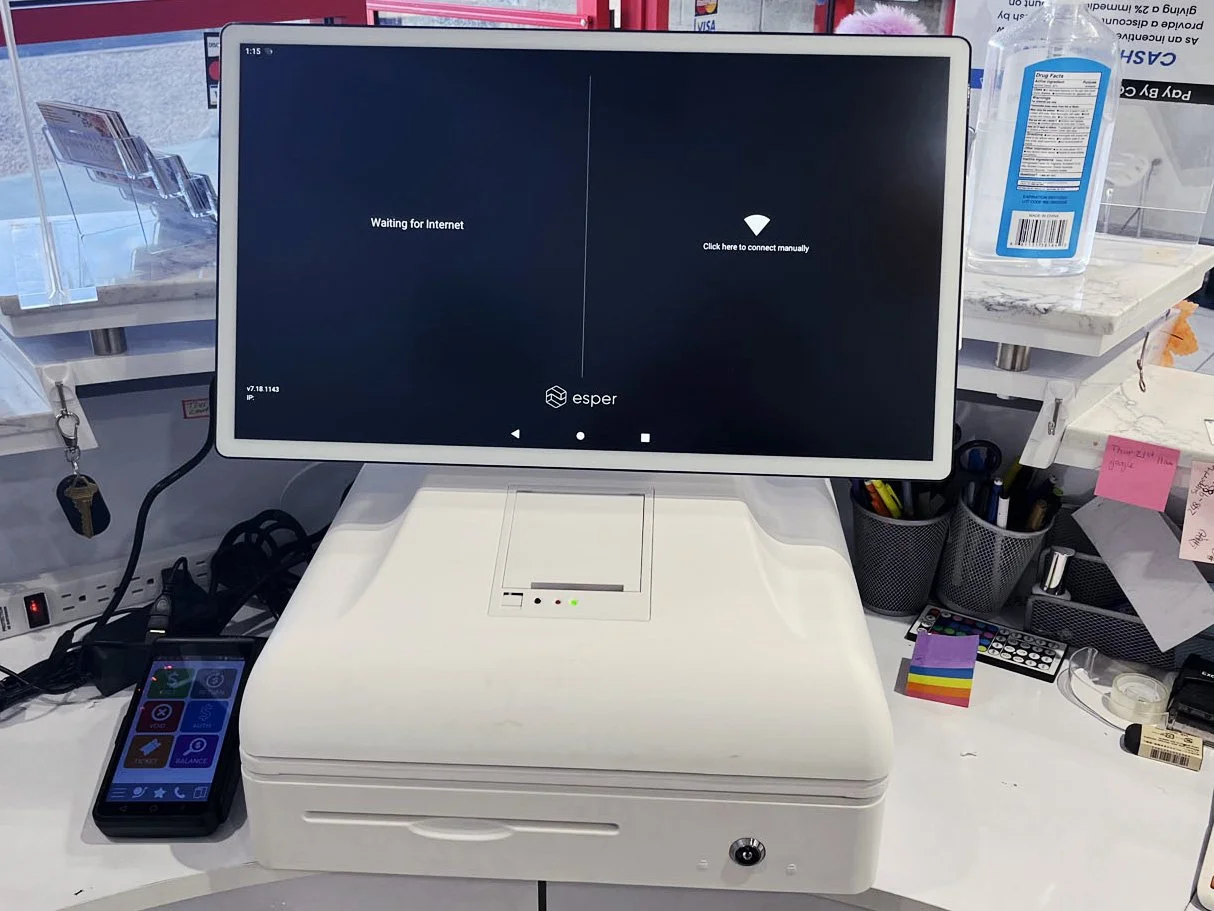
The first screen to pop up will be for internet connection. If you hardwired the NailSoft AiO to the store’s ethernet cable, it should be automatically connected and begin syncing. If you did not connect their ethernet cable, press “Click here to connect manually.”
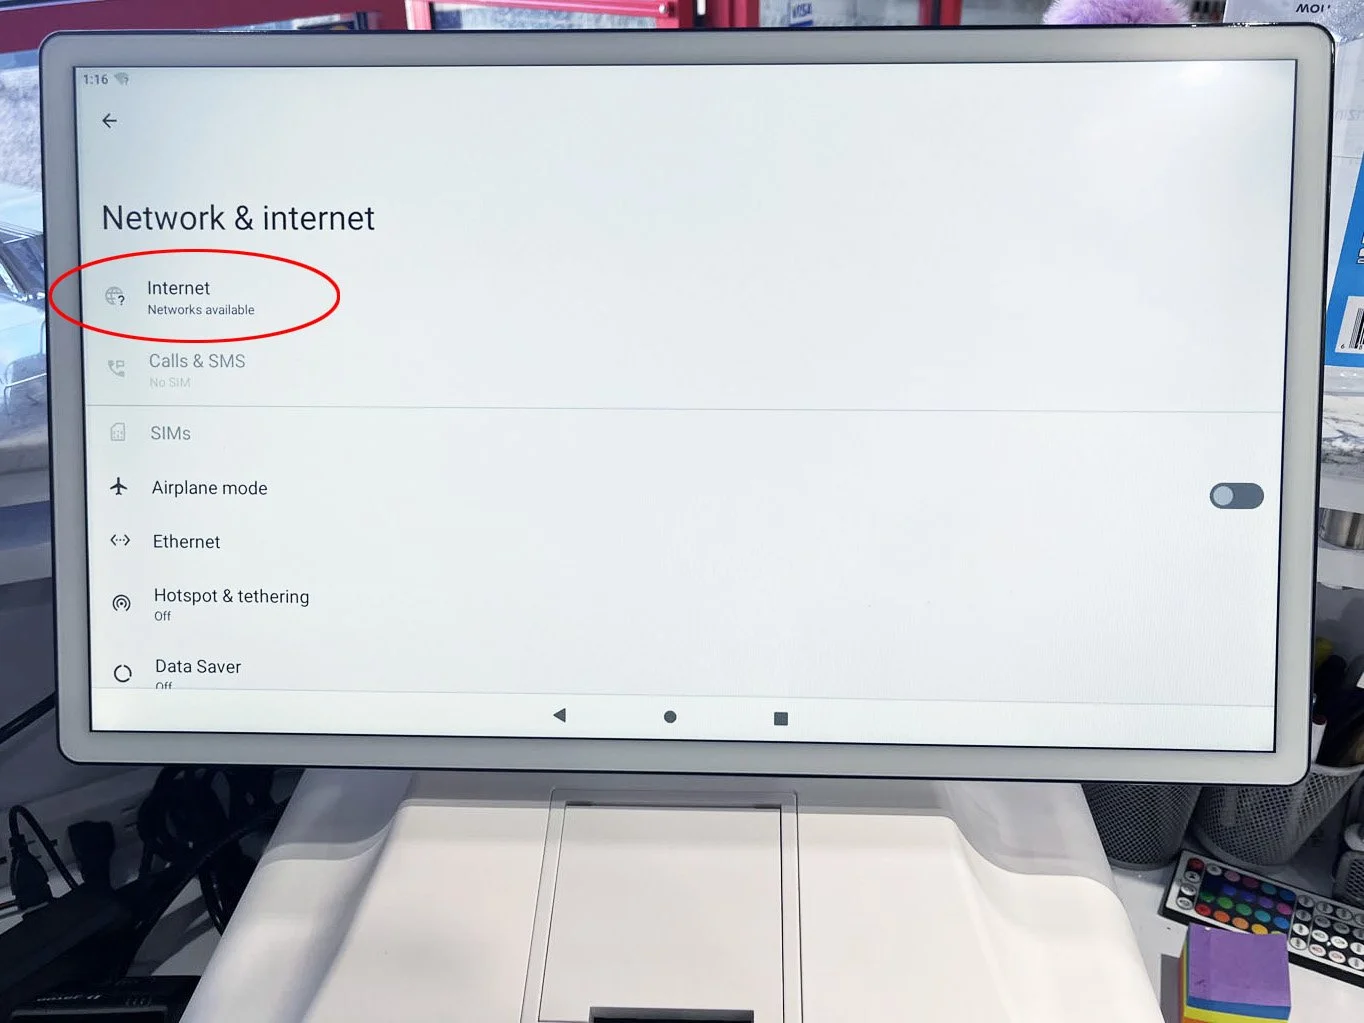
Select “Internet”
Find the store’s WiFi name in the list and select it.
Enter the WiFi password.
Wait a few minutes for the connection to be established. It will say “Connected to device. Can’t provide internet.” Then once it connects, it will automatically move to the next screen.
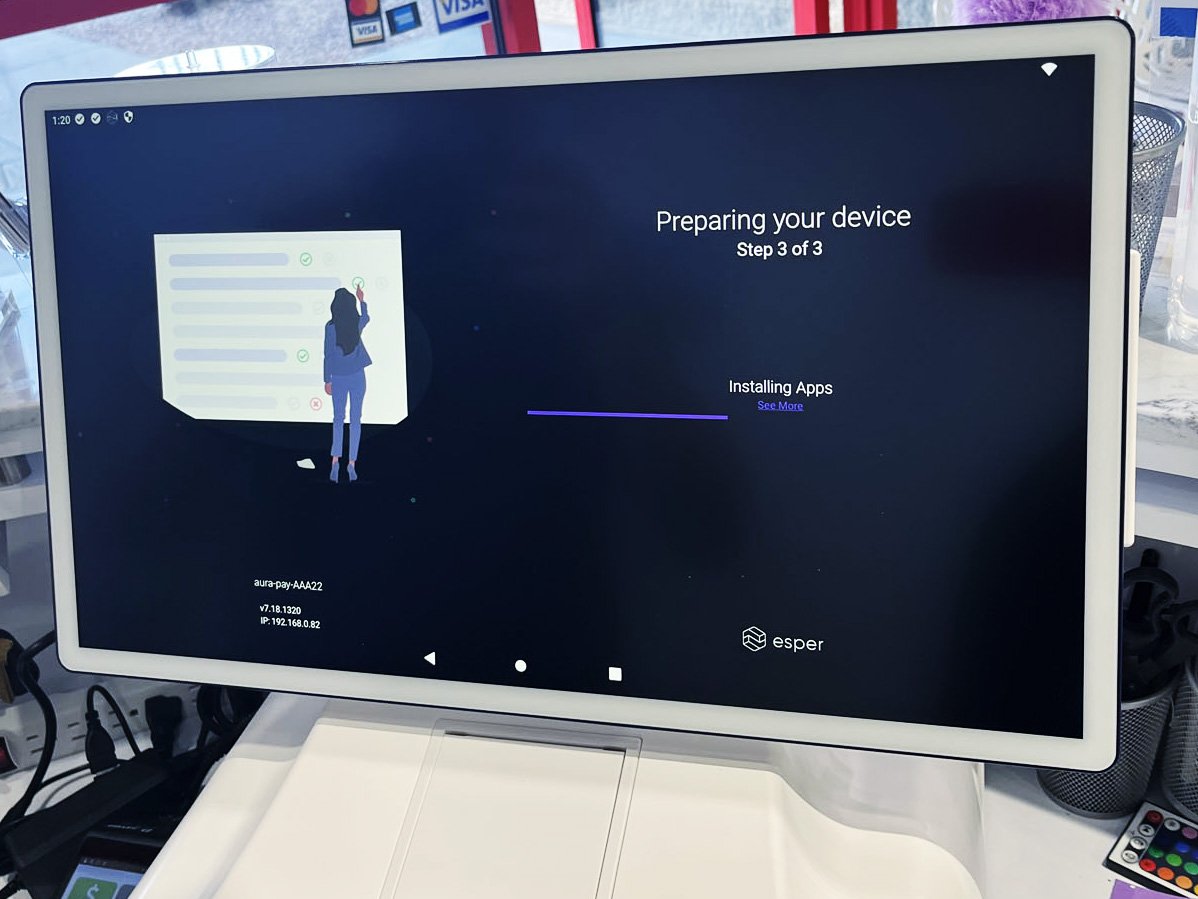
The next screen will show “Preparing your device.” The NailSoft AiO is now syncing and this process typically takes about 5 minutes.
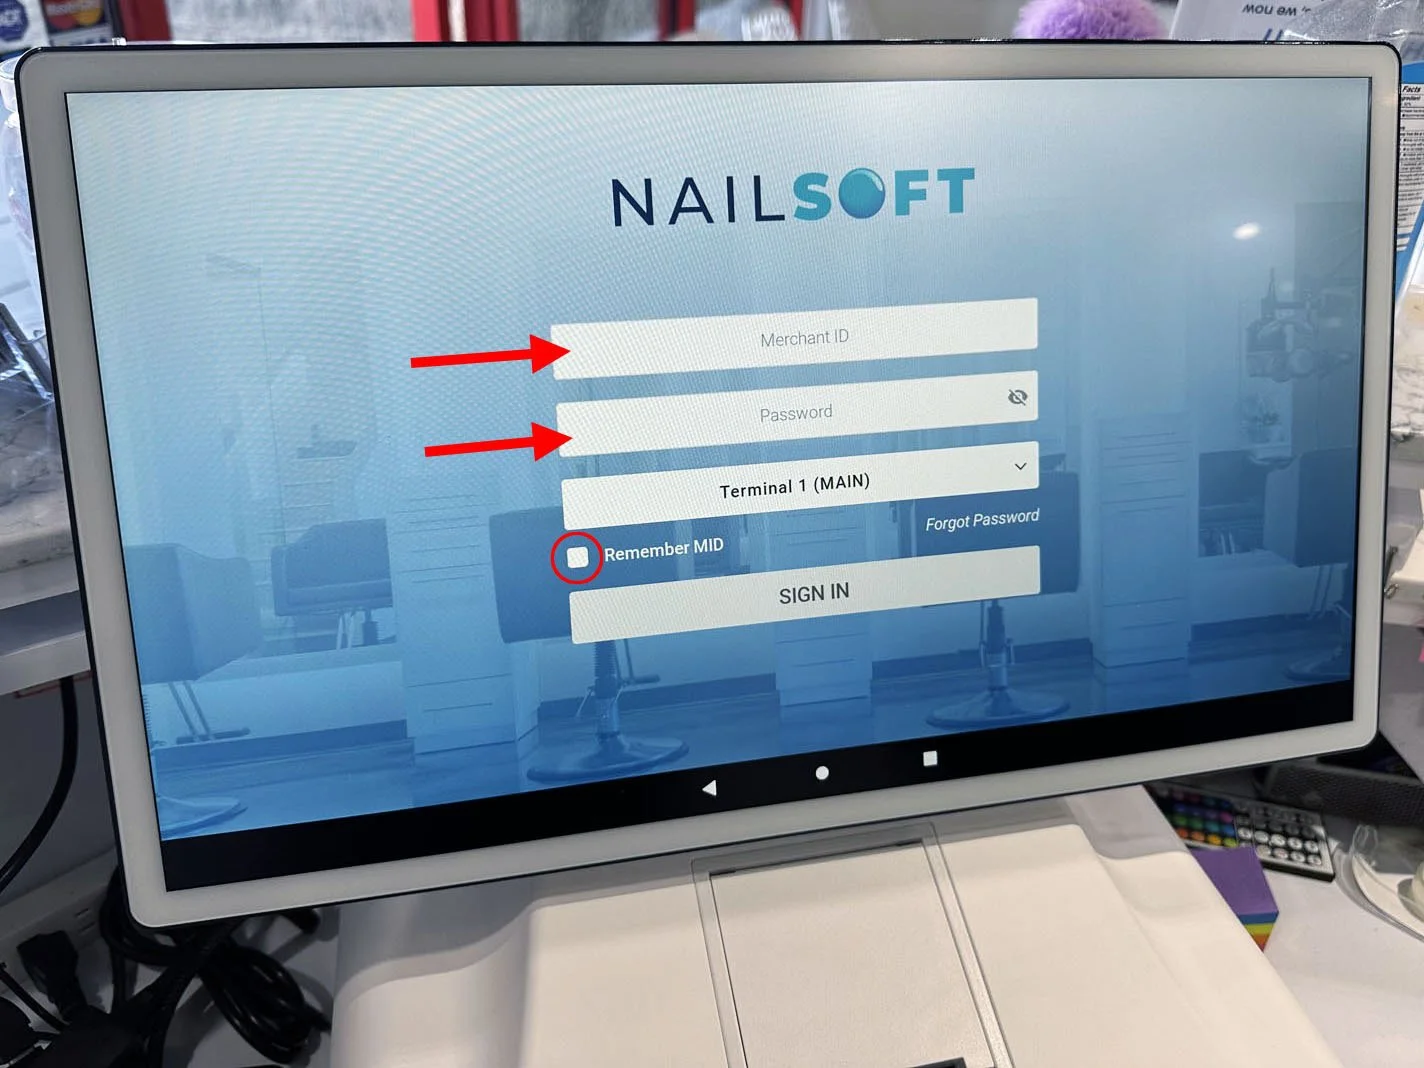
When syncing is complete, you will be at a NailSoft screen. Input the Merchant ID and Merchant Password and leave the third line as Terminal 1 (Main). Select “Remember MID”, then press “Sign In”.
G. Settings
1 . Confirm the Time Zone. On the NailSoft home screen, check the time clock in the upper left corner. Is it the correct time for your time zone? If the time is correct, skip to step 2.
If the time is not correct, press the home button (circle in bottom bar) and then select “Settings”.
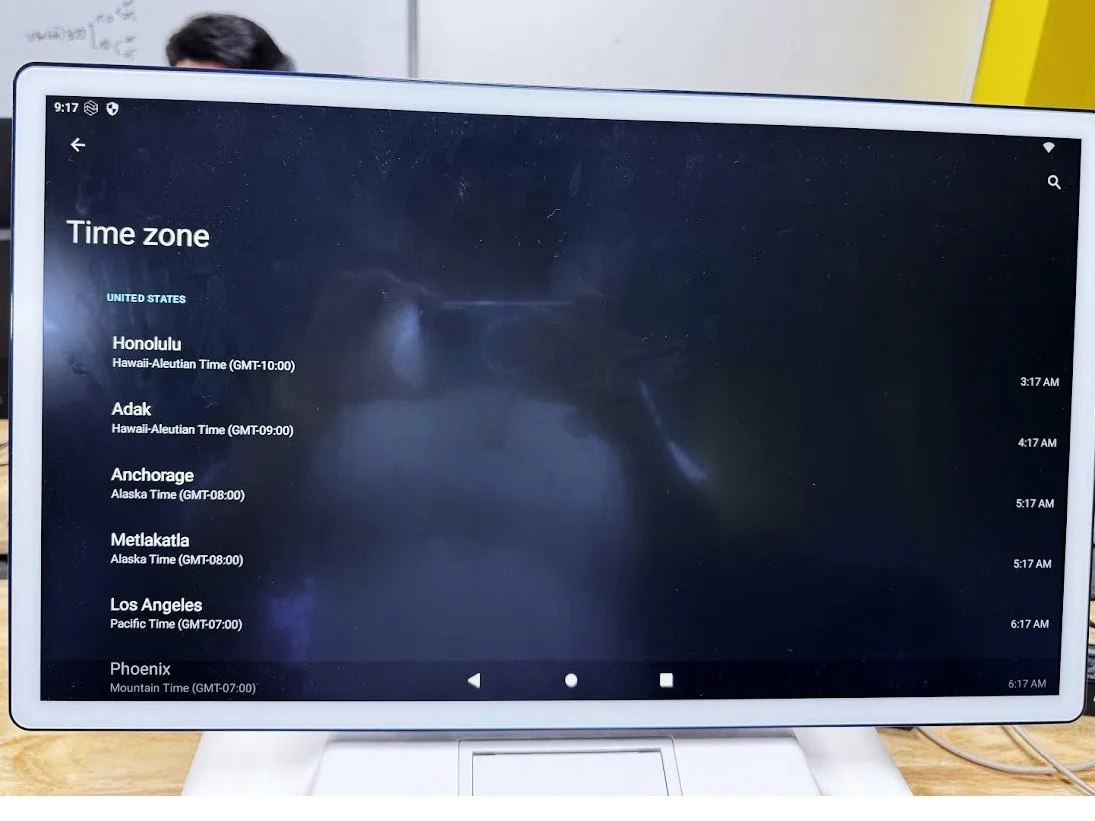
Scroll down and select “System”, then “Date & time”, then “Time zone”, then “Time zone” again.
Select the correct time zone for your local location. You should now see the time clock in the upper left corner automatically update to the correct local time.
Press the home button (circle in bottom bar).

2. Selecting the Payment Terminal. You’ll now update the settings for the Payment Terminal.
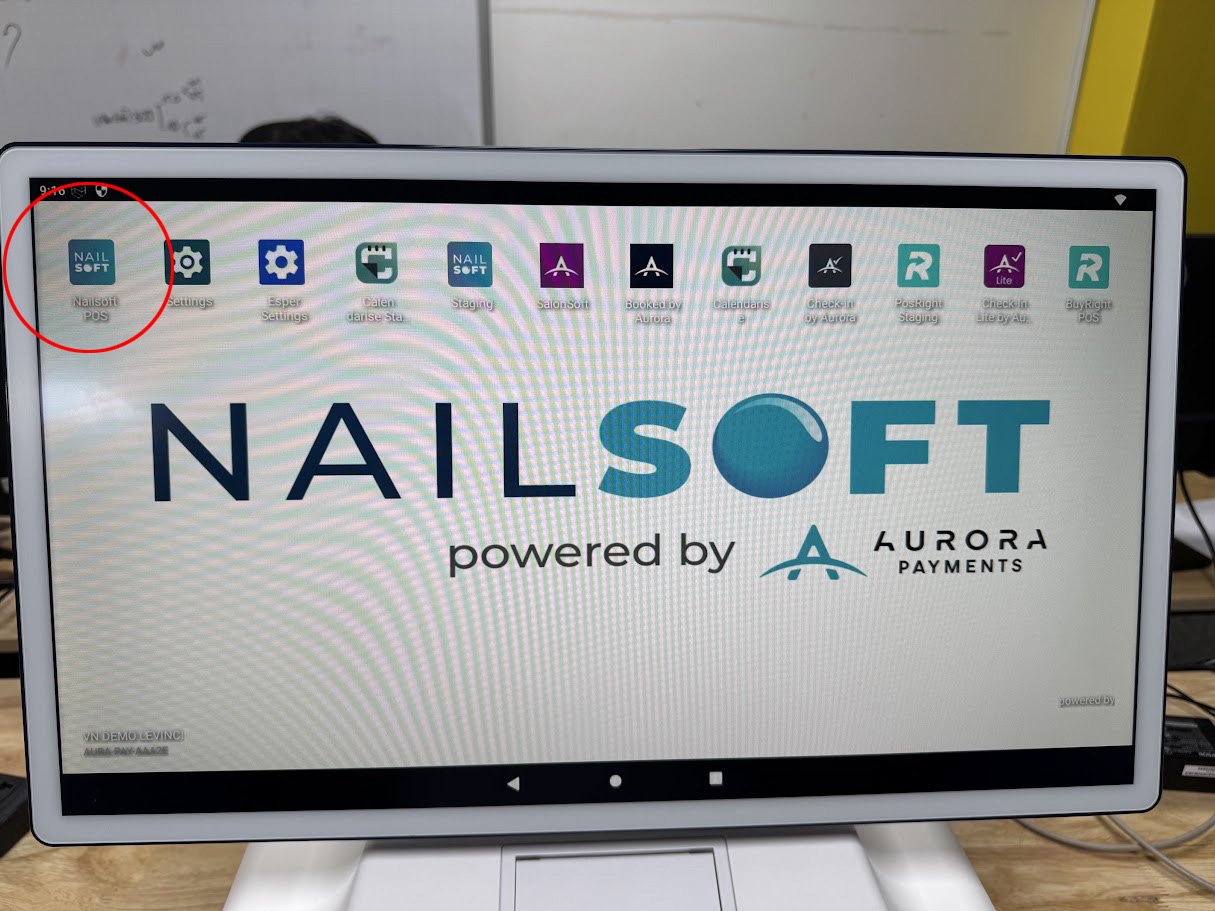
From the home screen, select “Nailsoft POS”.
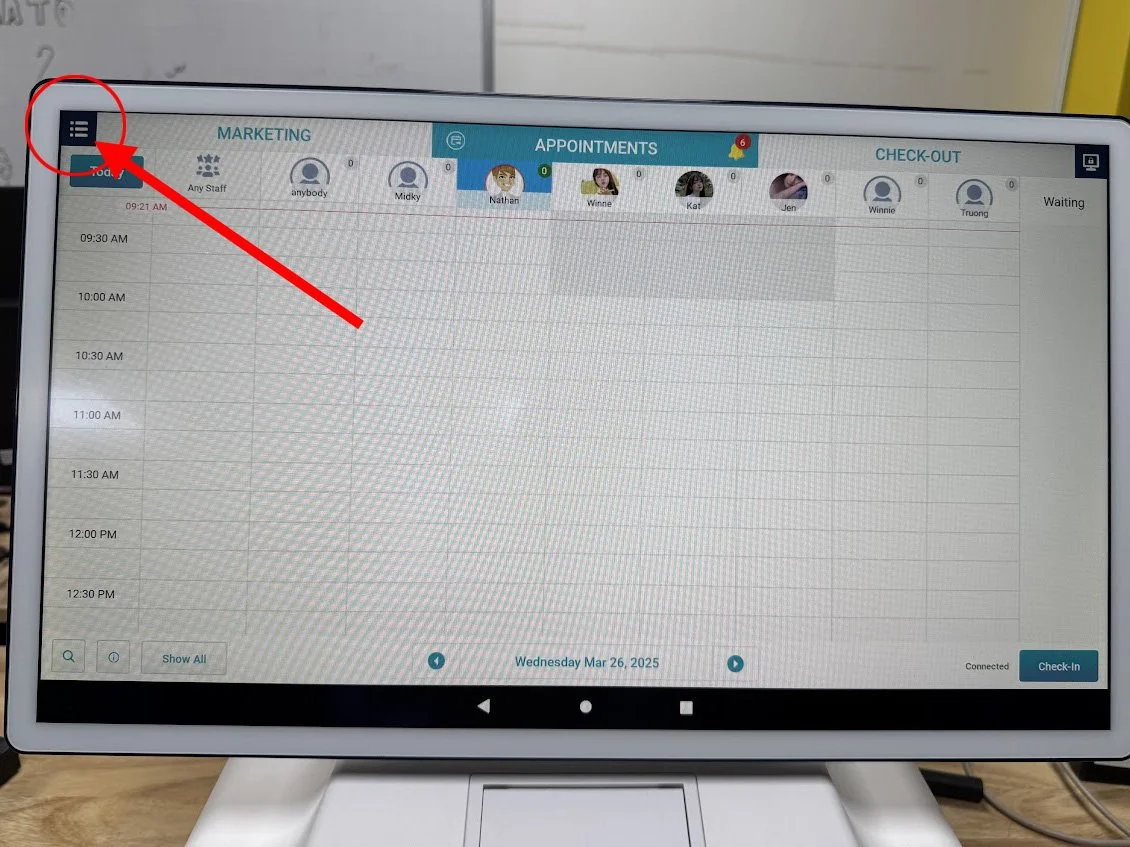
Press the menu button (upper left corner with three lines), then select “Settings”, then “Hardware”, then “Payment Terminal”, then “Add Device”.
If the payment terminal is a Dejavoo QD4, select “Dejavoo”.
Model: Enter “QD4”
TPN: Enter the TPN found in your work order.
Auth Key: Enter the Auth Key found in your work order.
Serial Number: Locate the serial number on a sticker at the top of the payment terminal by lifting up the top flap, then enter the serial number here.
Press “Save”, then select “Back”.
If the payment terminal is a Sunmi P2, select “Arise”
Model: Enter “P2”
TPN: Leave blank.
Auth Key: Leave blank.
Serial Number: Locate the serial number on a sticker on the back of the payment terminal near the bottom, then enter the serial number here.
Press “Save”, then select “Back”.


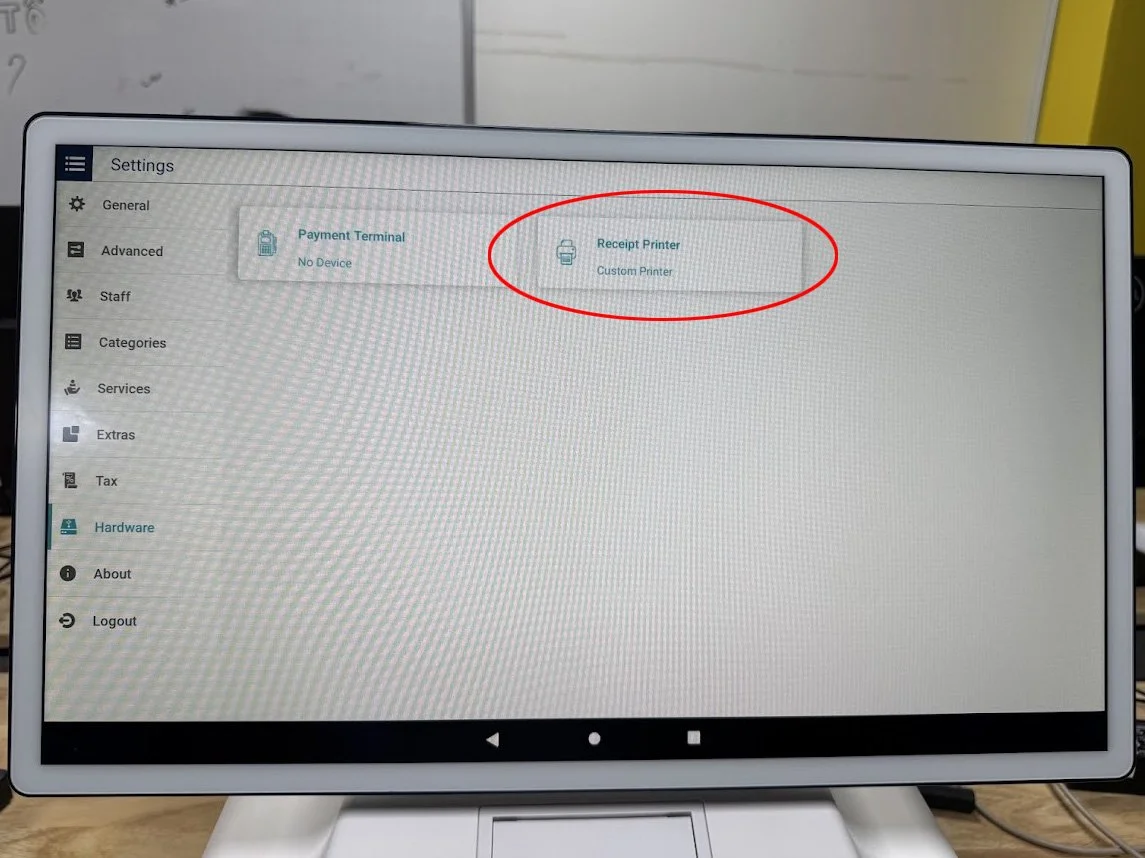
3. Selecting the Receipt Printer. You’ll now update the settings for the printer.
Select “Receipt Printer”
Under Connected Printer By, select “USB”.
Under My Printer Types, select “GT”.
Select “Custom Printer”, then select “Back”.
Select “Home” on the menu bar.

H. Test Transaction
Ask for the Store Manager or the Store Owner. Let them know they will need their company credit card to run a test transaction.
Never handle the store’s credit card. You will be showing them how to run a test transaction, but they will be able to swipe/tap their own company credit card.
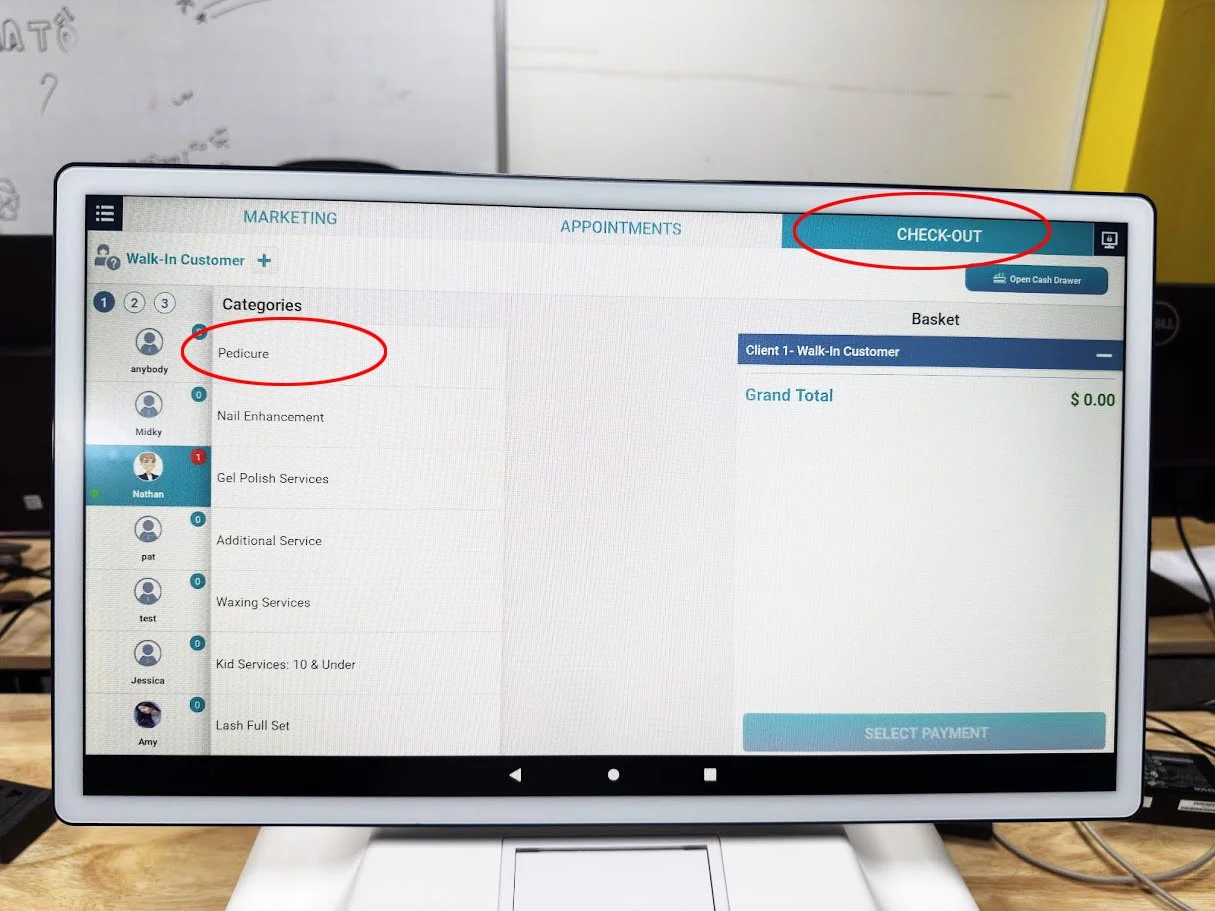
From the Home page, press “Check-Out” in the upper right corner.
Under the Categories section, press “Pedicure”, then select “Custom Service”.
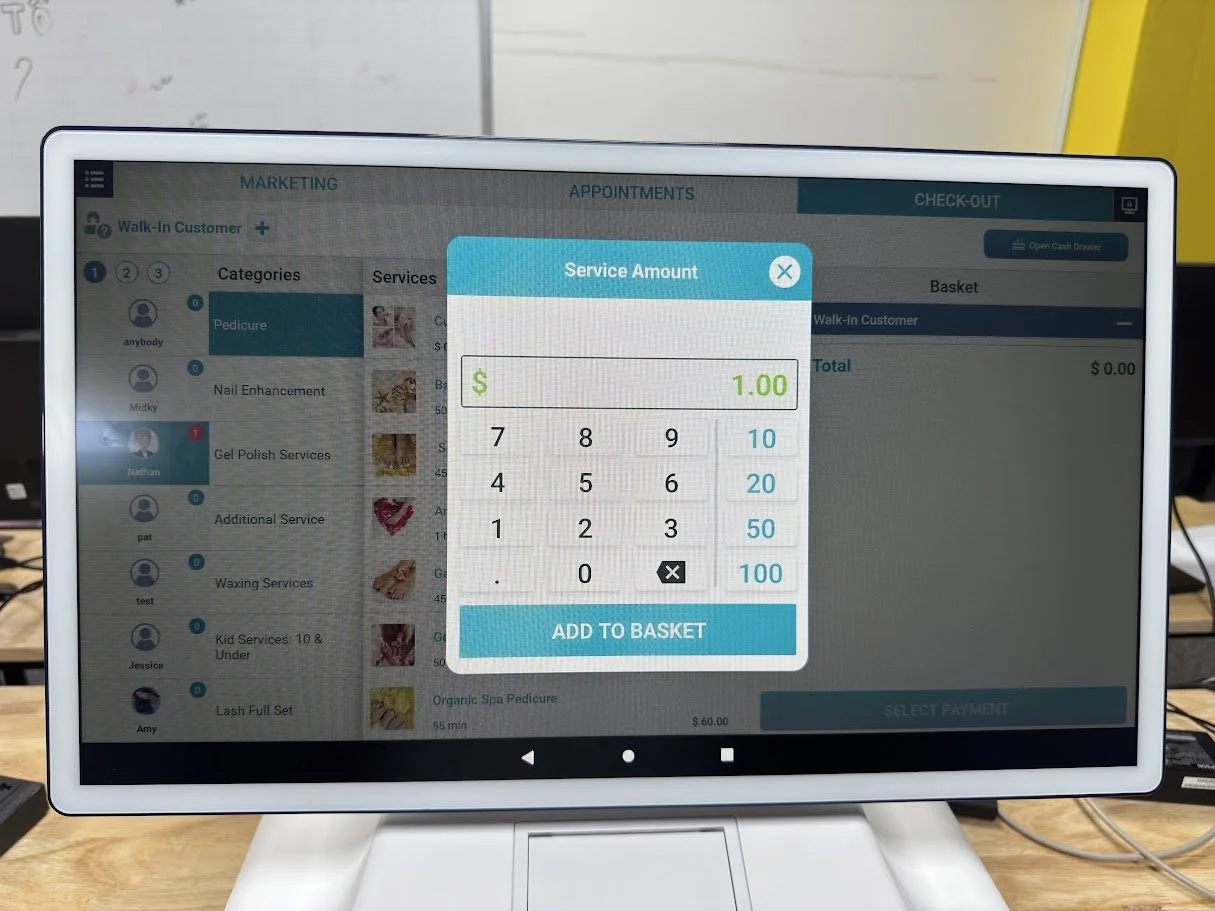
The Service Amount will pop up, then enter $1.00 and press “Add to Basket”.
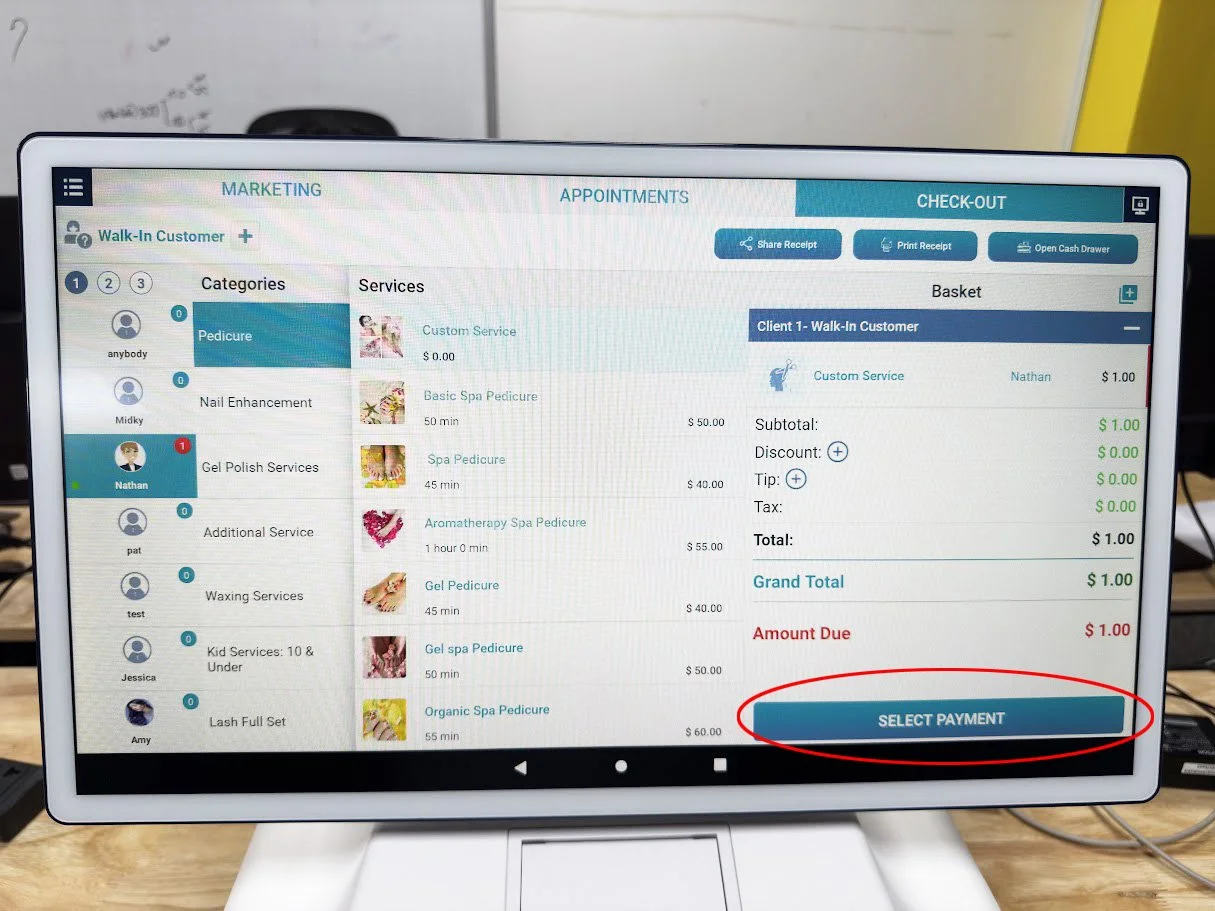
In the bottom right corner, press “Select Payment”, press “Credit Card” on the left, then press “Done”.
Have the Store Manager use their company credit card to tap or swipe the payment terminal to complete the transaction.
After the transaction is complete, press “Print Receipt” in the upper right corner. Hold onto this receipt as you will need to take a photo of it in your Verification Form.
Select “Home” on the menu bar.


H. Closeout
Clean up the area and give all spare parts to the Store Manager. Place any packaging material back into the shipping box, then let the manager know they should keep the AiO box in case of any issues or returns.
Log into the FastField mobile app (Apple or Android). Your username and password can be found in your work order under Buyer’s Custom Fields.
In the Inbox, find the store you are currently at and complete the Install Verification form. This must be completed while you are still at the store. You will need to take installation photos and answer a few questions, then submit the form before leaving the site.
Check Out within the FN mobile app before leaving the site.
Enter Closeout Notes in FN. Include information if you had any issues or delays on site. If the installation was not successful, please explain why. If everything went smooth, please keep your closeout notes brief.